SCOPE Installation
By supporting the IFPUG functional sizing process, SCOPE helps organisations effectively manage their software development.
Background
This section contains background information about the SCOPE installation process for all editions of SCOPE.
There are three editions of SCOPE available. The edition and the corresponding features that are enabled, are controlled by the SCOPE licence key
If you have any trouble installing SCOPE, please contact our support team. We provide free installation support for SCOPE.
Before you can install SCOPE you must save the installable to your hard drive and meet the machine requirements.
Note, to install SCOPE it is necessary to use an account with administrator privileges. Running SCOPE does not require administrator privileges.
The filename of the installer will include the details of the SCOPE version which will be installed. For example, the installer setup_SCOPE_5.1_255_20161017.exe, will install SCOPE 5.1 Build 255, which was released on the 17th of October 2016.
Note, The SCOPE installer is always digitally signed by Total Metrics Pty Ltd.
The SCOPE installer lets you customise the SCOPE installation. The available installation options are:
- Microsoft .NET Framework 4.0. Note even if selected, the .NET framework is installed only if SCOPE detects that none of: .NET 4, .NET 3 or .NET 2 are already installed. SCOPE is compatible with .NET 2, 3 and 4.
- Microsoft Access Runtime 2007 Service Pack 2. Note even if selected, the Microsoft Access runtime is only installed if none of: Microsoft Access or its runtime 2007, 2010, 2013, or 2016 are already installed. SCOPE is compatible with Access 2007, 2010, 2013, and 2016. SCOPE is compatible both with the full-version and runtime-version of Access. The Access runtime is used only for reporting and interfacing. It can be de-selected for installation if SCOPE’s reporting is not going to be used.
- WinMerge 2.14.0. WinMerge is the default comparison program for comparing SCOPE reports. It can be de-selected if comparing reports is not required.
- Spectral Core FullConvert. FullConvert is used to load Function Point Workbench (FPW) databases. If you are not upgrading from FPW – then this component it not needed.
- User Files. As well as installing the above components, SCOPE, by default, installs resources to the Program Files folder and to the My Documents folder. SCOPE’s installer always installs the Program Files. SCOPE’s installer by default will install some resources (the User Files) to the My Documents folder of the current user. If you are using an Administrator’s account to install SCOPE, and that Administrator is not a SCOPE user. Then it is not necessary to install the User Files. The User Files will automatically be installed when a SCOPE user first runs SCOPE.
Note, If selected, and not already installed, SCOPE installs the Microsoft Access 2007 run-time. There are published security patches available for this version. So, after installing Microsoft Access 2007 runtime please perform a Microsoft Update.
If you decide to move the location of the Access runtime, then SCOPE will not be able to automatically detect Access. So after SCOPE is installed you will need to enter the new pathname in SCOPE under View, Screen Display Options in the Main Menu. The standard set up path is : C:\Program Files (x86)\Microsoft Access Runtime\Office11
Installation
Follow these instructions to install SCOPE:
- If there is a previous version of SCOPE installed on the machine, then:
- Open SCOPE, from the Help menu then select «Change Registration Detail».
- If the «Deactivate» button is enabled, click it. SCOPE will release the licence and exit.
- Under Windows’s «Add or Remove Programs», select to Uninstall SCOPE.
- Download the SCOPE installer from the Total Metrics WWW site using the details provided by Total Metrics.
- A file with a name beginning with «setup_SCOPE» will have been downloaded. Double click to start the install. You will be prompted for Administrator credentials. Note, the installable will be digitally signed by Total Metrics Pty Ltd.
- Select the appropriate settings in the SCOPE installation wizard. Refer to the background above for details of the components.
- SCOPE may install some Microsoft components which should be upgraded to later versions. When installation has completed, run «Microsoft Update» to upgrade the components. Note, that some components are Microsoft Office components, so might not be updated by «Windows Update».
- Double click on the «SCOPE 5» shortcut on your desktop to start SCOPE.
- Enter your licence details when prompted. See also SCOPE License Registration and Activate SCOPE
SCOPE Enterprise with Microsoft SQL Server
Background
SCOPE Enterprise is our premium enterprise product that allows multiple users to access the same SCOPE database.
SCOPE Enterprise can use Microsoft Access or Microsoft SQL Server as its database. Installing SCOPE Enterprise with the Microsoft Access database requires no special configuration. However, installing with SQL Server is more involved. SCOPE Enterprise supports Microsoft SQL Server 2012, 2014 and 2016.
Latency between the client computer running SCOPE and the database is an important consideration in successfully deploying SCOPE. SCOPE relies on quick interactions with the database server. A roundtrip time, as measured for example using the ping command line utility of less than 30ms is desirable.
As an example, these instructions explain how to create a Microsoft SQL Server 2012 database that SCOPE Enterprise can use to store function point counts.
For properly licenced SCOPE Enterprise users. Total Metrics will have provided the versioned installation files, for example for SCOPE 5.2 these would be:
- scope_5_2_example_sql.FPA, An access database with tables that are linked to SQL Server.
- SCOPE_5_2_database_script.sql, An SQL Script to create the SCOPE database on SQL Server.
- scope.dsn, An example DSN which can be customised with the location of the SQL Server at your site.
SCOPE Enterprise uses a Microsoft Access database as an intermediary to SQL Server. The SQL Server database is configured as a linked table in a corresponding Microsoft Access database. This document describes one way to setup the database, some customisation depending on your circumstances will be required.
Note, SCOPE does not load the database server heavily; SQL Server Express is probably adequate.
We provide an installation script that creates the database. The database contains base tables and views of those tables. The scopeuser role, which the script creates, is granted access just to the views (but not to the base tables).
Note, that the database is created in FULL recovery mode by default, which allows for point in time recovery. Unless the logfile is managed, it will grow slowly, but increasingly, large.
Windows authentication and SQL Server authentication both work with SCOPE. However, if you use SQL authentication, SCOPE users will occasionally need to re-enter their passwords when SCOPE creates new connections to the SQL Server database.
The client computers need to have a matched SQL Server Native Client installed. This component is not installed by default by SCOPE’s installer. Note, we have found that version 10 of the client library to unacceptably slow, it should not be used. The Native Client is for Microsoft Server 2012 is downloadable here. Note, that the Native Client needs to be matched to the computer, it’s not possible to install the 32-bit Native Client on a 64-bit computer.
Summary
- Run the database install script on the server. The script is an SQL Server Command Mode (SQLCMD) script. You can change the name of the database that is created (or subsequently rename it).
- Grant the users permission on the scopeuser role.
- Install the SQL Server Native Client 11.0.
- Open Microsoft Access. Load the example database (scope_5_example_sql.FPA), then use the linked table manager to update the linked tables to refer to the newly created database.
- Open the new database in SCOPE.
Detailed Steps
- Create the database.
- Double click «SCOPE_5_database_script.sql». Microsoft SQL Server Management Studio should open.
- From the «Query» menu, select «SQL CMD Mode».
- Adjust the DatabaseName parameter to the name of the database that you wish to create.
- Click «Execute». «Query executed successfully» should be reported.
- Grant permissions.
- In Microsoft SQL Server Management Studio go to «Security->Logins»
- Find or create the window’s user group which will access SCOPE.
- In the «Login Properties», select «User Mapping» then grant the Login the «scopeuser» permission to the newly created database.
- Install the SQL Server Native Client.
- Configure the example database to refer to the SQL Server database.
- The DSN contains connection details to your SQL Server. Open scope.dsn in a text editor. Change «Database» to the name of the database you created in step 1. Change «Server» to the name of your database server.
- Open «scope_5_example_sql.FPA» in Microsoft Access.
- Right-click on the tables, select «Linked Table Manager»
- In the Linked Table Manager, click «Always prompt for a new location», click «Select All», and then click «OK»
- Select the scope.dsn file that you edited as the new «File Data Source». Click «OK». Microsoft Access should report that «All selected linked tables were successfully refreshed.»
- Open the new database in SCOPE.
Reporting Installation Problems
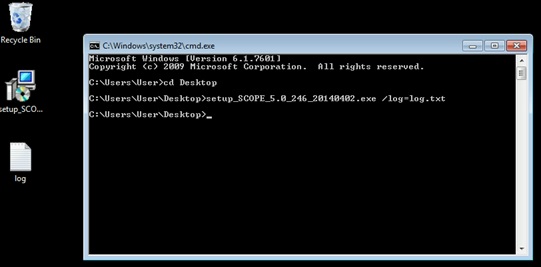
If the SCOPE installation fails please contact support@totalmetrics.com and provide us with a log file from the installer. The following steps to create the log file assume that the installer is currently on the Desktop.
- Press WindowsKey + R, that is Windows Key and "r" at the same time. The run box should appear
- Type "cmd", without the quotes into the box
- A black window should open. Click on the black box. Type "cd Desktop", then press Enter
- Type the name of the installer, followed by /log=log.txt", then press Enter. Note the name of the installer will not necessarily be the same as in the screenshot below
- This will create a log file, called "log.txt", on your Desktop. Please email us the log file so that we can diagnose the issue